Posts

Showing posts from 2010

Benjamin beads!

Image
Benjamin has been asking me if he could sew with beads for a long time now, so one day, when he was home sick from school, I let him have a go. He did great. He seems to be a natural, actually. He picked up the small beads with his needle, and counted them twice to double check. I held the thing down while he stitched back through, but otherwise he did the whole thing by himself. Ta da! Here it is, the pretty little flower.

My first beads

Image
This is me, beading, back in 1973. And I'm still beading!

Turquoise and Brown Star

Image
I'm beading again (la la la). I thought I'd share this pendant in turquoise and brown. The lighter roundels are probably chrisocola. I'm wearing it today!

Pink Flower! (New idea realized)

Image
Here's another picture of my new design. In the process of making this, I had a few (dozen) other ideas that I'd like to try, and I'm moving on.

The start of a new idea (6)

Image
Have you been following along as I log my progress toward a new design using herringbone with two different sizes of seed beads? I just finished my sixth piece in this effort. Here are the first four: http://florenceturnour.blogspot.com/2010/09/start-of-new-idea.html http://florenceturnour.blogspot.com/2010/10/start-of-new-idea-2.html http://florenceturnour.blogspot.com/2010/10/start-of-new-idea-3.html http://florenceturnour.blogspot.com/2010/10/start-of-new-idea-4.html http://florenceturnour.blogspot.com/2010/10/start-of-new-idea-5.html And (drumroll...) here's number 6. I'm liking how this one came out! Hey, Gwen ?!

Design Team Call

Image
Announcing beAd Infinitum 's first Design Team! Show your beAd Infinitum creations with links to our site in exchange for FREE PATTERNS! Call for Applications to Join beAd Infinitum's first Design Team beAd Infinitum is looking for a design team of 3 or 4 talented beaders to make and publicly display jewelry on the internet using our patterns. Term: We are looking for a 4- or 6-month commitment, beginning November 2010. During a design team member’s term, beAd Infinitum provides the team members with two patterns of his or her choice the first month, and a pattern of his or her choice each subsequent month of the term. credit and a link to the design team member’s blog, web site, and/or Etsy site on each gallery page featuring the team member’s work. a 50% discount on additional beAd Infinitum products during the term. this nifty design team banner to display on his or her blog. The design team members each commit to creating at least two beautiful pieces of jewel

The start of a new idea (5)

Image
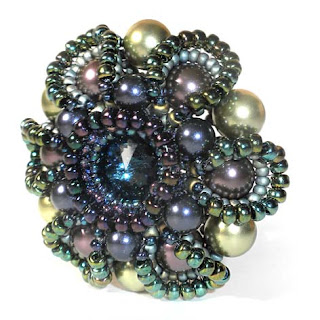
Back on track, I decided to repeat my attempt at try number 3, except with more beads, so the circle is larger. It came out nicely, and I like the effect of the herringbone decoration. I also like the color in this one. It wants a rivoli in the center! To go with that idea, I need to start with the rivoli and work outwards. So I didn't finish embellishing this one, or figuring out how to give it some structure (it is quite floppy). Shortly after Laura McCabe published that beautiful rivoli necklace pattern in Beadwork Magazine, we started seeing rivolis everywhere. We wondered if our Fringe Method technique would be a good way to capture a rivoli. In one of the rare occasions that Gwen and I were together in the same room, we quickly came up with the Rivoli Sunflower design, in which we modify the Fringe Method technique to accommodate the acute angles of the rivoli. Rivoli Sunflowers In my next attempt at a new design, I'm going to start with a rivoli captured by t

The start of a new idea (4)

Image
OK, I don't know what happened on this one. I was planning to try to make a flower shape and it started looking like it could be a cube. I couldn't keep myself on task, and ended up following through with that thought, and all of a sudden, I had this small symmetric boulder. I'm not sure it deserved its own post, but to make an honest log of my efforts toward a new design, I guess it has to be here. Here are my tries so far:

The start of a new idea (3)

Image
In this incarnation, I planned to doodle around a decorative right angle weave square. I planned to keep the herringbone decorations from getting too ruffled or twisted. I switched to smaller herringbone embellishments because I was trying not to cover up all the larger beads in the array. As I started embellishing, I saw a petal shape emerging. I'd love to design a flower, so I squished the thing together to make the petals poke up. I started to make a leaf, but then decided to turn it into a bail instead. I'll work on leaves after I have the flower under control. For a flower, I'd not need all the beads in the RAW array, however, and I think in the resulting design, all of these larger beads clutter the edges. I need more petals; I'd really like another row of petals behind the first staggered so they stick out between the front ones. We'll see if I can figure out how to do that in the next go round. I just looked at my first design, and I'm not sure they

The start of a new idea (2)

Image
So I had a good stare at the herringbone weave project that I shared in this post: http://florenceturnour.blogspot.com/2010/09/start-of-new-idea.html I decided that I didn't like the contrast between the color of the large and small beads in the herringbone weave, and that I didn't like that the outer edge ruffled. So on my second attempt, I changed the colors, and I eliminated the outer edge. In an attempt to be lazy, I also used only four core beads this time. This had an effect that I should have predicted: the seed bead path, which was one long path in the five sided version, is two separate paths in the four sided version. The two paths each encircle a pair core beads that lie across the center from one another. The look is interesting. Without the outer edge, this piece does not hold its form as well as the five sided version. It would need more structural stability to make a good pendant, but with all those 8/0's hanging around, there are plenty of places to a

New and Old Kit Colors

Image
We now have kits for the Kepler's Star weave in Periwinkle and Silver. We have also restocked the Blue Velvet Rosebud  and matching Four of Spades beaded bead kits. That Blue Velvet might be my favorite color scheme ever. Rosebud Four of Spade Happy Beading!

The start of a new idea

Image
I love the idea of documenting the progress toward a new design, so I thought I'd share my experiment log here on my blog. It's hard to tell at the beginning if the idea will ever pan out, but this one is interesting enough for me to think it might go somewhere. It is also not spectacularly beautiful, so definitely needs some work. As you see, Gwen and I have been systematically finding uses for Herringbone Stitch in our beadwork. We've been enjoying the curve that you get from the Herringbone weave afforded by using two different bead sizes, as on the columns on the Ionic Cube (right) and in the Herringbone trim on the Hour Glassy Bead (center). I begin my search for a new design with the two-sized, curved Herringbone Stitch in mind. My plan is to create a web of the smaller of my seed beads (11/0 this time), and then decorate it with Herringbone Stitch using the larger size seed bead (8/0 this time). Here's what I stayed up late doing yesterday. ( I gave exams

My last Twinchie

Image
Here is a "Twinchie," which is a 2in x 2in card that I made for a swap on Splitcoaststampers.com. This seahorse is the one I used for my stencil in this post: http://florenceturnour.blogspot.com/2010/09/seahorse.html I drew the seahorse and all of the other components of this pull out in Adobe Illustrator, and cut them out on my Silhouette cutter. It says "The oldest seahorse fossils date back thirteen million years." Wow, that's a long time. Seahorse Twinchie closed (left) and open (right)

The evolution of a design

Image
Finding an artist that I can collaborate with at so many levels is just amazing. The Ionic Polyhedra beaded bead collection, a new pattern that we are releasing today at beAd Infinitum , is a testament to how ideas can really take off when Gwen Fisher and I work together. Gwen wrote the (free) Strappy Strip herringbone weave pattern to give our visitors a beaded chain on which to hang the Rivoli Sunflower and other beaded pendants. With it I finally learned the Herringbone Weave, which I had long ignored. I really took to that stitch and made, with it, many pretty and many ugly designs. These include an early version of the Hour Glassy Beaded Bead and the Ionic Cube shown below. Early versions of designs using Herringbone Stitch I really liked the look of the Herringbone trim, but both were a real pain to make. There were spots in which the thread peeked through (no! not thread!) and there were parts of the stitching in which I had to work really hard to get the needle into

beAd Infinitum: new patterns

Image
Did you see that Cindy's Balloon Box beaded bead pattern is now up for sale? Isn't it pretty! Copyright 2010: Cindy Holsclaw Beads beads beads beads beads....

Colored pencils

Image
I dug my colored pencils out of the art supplies box in the garage. It has been fun to look at all the ways that the stamping community uses them. I've been testing the techniques for myself; here's what I've tried: Blending with an odorless paint thinner (I used Mona Lisa brand), following this tutorial SplitcoastStampers Tutorial: Copics with Pencils though I put so much colored pencil, my copic coloring shows through not at all. Blending with a colorless blender (which is a colorless colored pencil that adds the waxy medium to your drawing and helps burnish and blend; mine came in a pack of two from prismacolor) Adding ink outlines, following this tutorial SplitcoastStampers Tutorial: Blended Pencils . Hats: Image by Aunty Amy (I Brake for Stamps!) In the project above, I stamped two copies of the image. I colored the hats on one, and the wooden racks on the other, and cut them out to assemble them on a new sheet of white paper. When coloring the images, I use

Water

Image
I've been struggling to add stamps to decorate the backgrounds of my fish and seahorses. In this image, I used one of Inkadinkado's anamal hide stamps to make water.   Here's where I first explained about my stencils and stamps: Butterfly Dresses

A seahorse!

Image
I drew this seahorse for the twinchie swap as well. Here is the kinetic card I first made with this design. Once again, I used an animal hide stamp from Inkadinkado to give the stencil texture. I'm still trying to get the hang of the koi as well. Here's where I first explained about my stencils and stamps: Butterfly Dresses

My 7th fish

Image
Inkadinkado has a couple of sets of animal hide stamps. I bought the scaly one (rather than the stripy and spotty one) with my Michael's 40% coupon (which was burning a hole in my pocket) to use with this fish stencil. I enlarged the Koi image that I drew for the Twinchie Swap to make the stencils for this fish. I used three stencils this time: the whole shape, the eyes, and the side pectoral fins. It took 7 tries to get this image; while the technique worked well, it took me a while to get the layering of the stencils to look reasonable. There are a few different scaly stamps in this set; you can expect to see more fish coming soon. Here's where I first explained about my stencils and stamps: Butterfly Dresses

Another Apron

Image
I like pink and brown.

Acetate Stencils: Apron!

Image
I'm continuing my experiments with stencils, and planning a tutorial that I hope will entertain people with cutters and stamps. My first project was a dress, decorated with butterflies . The textures I get with this combination of tools and techniques remind me of fabric, so I decided another article of clothing was in order. Although 'tisn't the season yet, it will be before we know it, and I pulled out my red and green. As with the dress , I drew the apron in Adobe Illustrator, and cut it out on my Silhouette cutter. This one uses two stencils, one with the apron and the other with the pockets, belt and bow. I kept the cut-out pieces for the red parts, and used them as a mask to get the two-colored apron. I'm so excited how easy and fun this is; I love finding new things to do with my cutter and my stamps.

What I've learned about resin so far

Image
I posted some buttons I made using resin a while back.  In this post I share some of the things I learned about using resin in the process. Resources: I got interested in using resin by reading this article in Bead Style magazine: Stir Up Some Sweet Delights, by Steven James I tried it after reading this tutorial: Beading Daily Tutorial Be sure to watch the video at the bottom. There is a book that looks quite good by Sherri Haab ; I have not yet purchased it, but when I get stuck into my Christmas ornament projects, I probably will. There's a nice video on You-tube here: Making Resin Rings by John Golden Easy Cast Clear Casting Resin I used Easy Cast Clear Casting Resin, which I bought from a seller on ebay once and at Michael's once. With this product, you measure equal parts of the hardener and the resin.  After combining the resin and the hardener, the mixture must be stirred for 2 minutes, moved to a clean container, and stirred for another minute. Th