Posts

Showing posts from September, 2010

The start of a new idea

Image
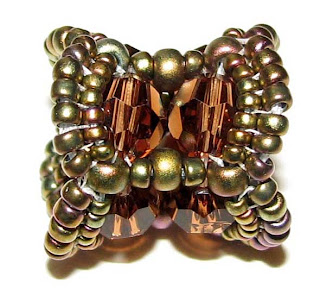
I love the idea of documenting the progress toward a new design, so I thought I'd share my experiment log here on my blog. It's hard to tell at the beginning if the idea will ever pan out, but this one is interesting enough for me to think it might go somewhere. It is also not spectacularly beautiful, so definitely needs some work. As you see, Gwen and I have been systematically finding uses for Herringbone Stitch in our beadwork. We've been enjoying the curve that you get from the Herringbone weave afforded by using two different bead sizes, as on the columns on the Ionic Cube (right) and in the Herringbone trim on the Hour Glassy Bead (center). I begin my search for a new design with the two-sized, curved Herringbone Stitch in mind. My plan is to create a web of the smaller of my seed beads (11/0 this time), and then decorate it with Herringbone Stitch using the larger size seed bead (8/0 this time). Here's what I stayed up late doing yesterday. ( I gave exams

My last Twinchie

Image
Here is a "Twinchie," which is a 2in x 2in card that I made for a swap on Splitcoaststampers.com. This seahorse is the one I used for my stencil in this post: http://florenceturnour.blogspot.com/2010/09/seahorse.html I drew the seahorse and all of the other components of this pull out in Adobe Illustrator, and cut them out on my Silhouette cutter. It says "The oldest seahorse fossils date back thirteen million years." Wow, that's a long time. Seahorse Twinchie closed (left) and open (right)

The evolution of a design

Image
Finding an artist that I can collaborate with at so many levels is just amazing. The Ionic Polyhedra beaded bead collection, a new pattern that we are releasing today at beAd Infinitum , is a testament to how ideas can really take off when Gwen Fisher and I work together. Gwen wrote the (free) Strappy Strip herringbone weave pattern to give our visitors a beaded chain on which to hang the Rivoli Sunflower and other beaded pendants. With it I finally learned the Herringbone Weave, which I had long ignored. I really took to that stitch and made, with it, many pretty and many ugly designs. These include an early version of the Hour Glassy Beaded Bead and the Ionic Cube shown below. Early versions of designs using Herringbone Stitch I really liked the look of the Herringbone trim, but both were a real pain to make. There were spots in which the thread peeked through (no! not thread!) and there were parts of the stitching in which I had to work really hard to get the needle into

beAd Infinitum: new patterns

Image
Did you see that Cindy's Balloon Box beaded bead pattern is now up for sale? Isn't it pretty! Copyright 2010: Cindy Holsclaw Beads beads beads beads beads....

Colored pencils

Image
I dug my colored pencils out of the art supplies box in the garage. It has been fun to look at all the ways that the stamping community uses them. I've been testing the techniques for myself; here's what I've tried: Blending with an odorless paint thinner (I used Mona Lisa brand), following this tutorial SplitcoastStampers Tutorial: Copics with Pencils though I put so much colored pencil, my copic coloring shows through not at all. Blending with a colorless blender (which is a colorless colored pencil that adds the waxy medium to your drawing and helps burnish and blend; mine came in a pack of two from prismacolor) Adding ink outlines, following this tutorial SplitcoastStampers Tutorial: Blended Pencils . Hats: Image by Aunty Amy (I Brake for Stamps!) In the project above, I stamped two copies of the image. I colored the hats on one, and the wooden racks on the other, and cut them out to assemble them on a new sheet of white paper. When coloring the images, I use

Water

Image
I've been struggling to add stamps to decorate the backgrounds of my fish and seahorses. In this image, I used one of Inkadinkado's anamal hide stamps to make water.   Here's where I first explained about my stencils and stamps: Butterfly Dresses

A seahorse!

Image
I drew this seahorse for the twinchie swap as well. Here is the kinetic card I first made with this design. Once again, I used an animal hide stamp from Inkadinkado to give the stencil texture. I'm still trying to get the hang of the koi as well. Here's where I first explained about my stencils and stamps: Butterfly Dresses

My 7th fish

Image
Inkadinkado has a couple of sets of animal hide stamps. I bought the scaly one (rather than the stripy and spotty one) with my Michael's 40% coupon (which was burning a hole in my pocket) to use with this fish stencil. I enlarged the Koi image that I drew for the Twinchie Swap to make the stencils for this fish. I used three stencils this time: the whole shape, the eyes, and the side pectoral fins. It took 7 tries to get this image; while the technique worked well, it took me a while to get the layering of the stencils to look reasonable. There are a few different scaly stamps in this set; you can expect to see more fish coming soon. Here's where I first explained about my stencils and stamps: Butterfly Dresses

Another Apron

Image
I like pink and brown.

Acetate Stencils: Apron!

Image
I'm continuing my experiments with stencils, and planning a tutorial that I hope will entertain people with cutters and stamps. My first project was a dress, decorated with butterflies . The textures I get with this combination of tools and techniques remind me of fabric, so I decided another article of clothing was in order. Although 'tisn't the season yet, it will be before we know it, and I pulled out my red and green. As with the dress , I drew the apron in Adobe Illustrator, and cut it out on my Silhouette cutter. This one uses two stencils, one with the apron and the other with the pockets, belt and bow. I kept the cut-out pieces for the red parts, and used them as a mask to get the two-colored apron. I'm so excited how easy and fun this is; I love finding new things to do with my cutter and my stamps.

What I've learned about resin so far

Image
I posted some buttons I made using resin a while back.  In this post I share some of the things I learned about using resin in the process. Resources: I got interested in using resin by reading this article in Bead Style magazine: Stir Up Some Sweet Delights, by Steven James I tried it after reading this tutorial: Beading Daily Tutorial Be sure to watch the video at the bottom. There is a book that looks quite good by Sherri Haab ; I have not yet purchased it, but when I get stuck into my Christmas ornament projects, I probably will. There's a nice video on You-tube here: Making Resin Rings by John Golden Easy Cast Clear Casting Resin I used Easy Cast Clear Casting Resin, which I bought from a seller on ebay once and at Michael's once. With this product, you measure equal parts of the hardener and the resin.  After combining the resin and the hardener, the mixture must be stirred for 2 minutes, moved to a clean container, and stirred for another minute. Th

That's me!

Image
I let my son Benjamin use my stencil with his washable stamp pads this afternoon. He drew me!

Butterfly Dresses

Image
I just have to stay up a little later to tell you what I stayed up all night doing. Don't you sometimes wish you had clothes with fabric made using some of the great techniques we use to decorate paper? I find myself slightly tempted by the fabric dyes and paints, but how I do not need another medium to work in.  This project was motivated by that thought, however. I drew a dress in Adobe Illustrator, and cut it out of acetate (laser printer transparencies) on my Silhouette cutter. I used removable adhesive to attach the acetate stencil to cardstock and with a make-up dauber, I pushed ink from various stamp pads from the stencil onto the paper, to shade the dress. The butterfly background is unmounted. I lay it face up on the table and inked a large enough portion to cover the dress. Then I put the card with the stencil face down on the background stamp and rubbed it with my fingers. Here are the results: I photoshopped these only enough to make it look like they are all on one

More Twinchies

Image
Here are two more of the four 2x2 inch cards I've made for my swap. The crab card says Collinectes sapidus, which is the scientific name of this type of crab. The Koi card says, "In the blue sky, The koi are swimming. Wonderful weather.-Basho."