Posts

Showing posts from April, 2012

Can you dig it? Yes I can!

Image
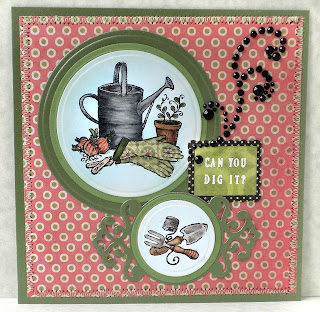
I bought two sets of stamps from Flourishes recently, so I thought I'd participate in their challenge. In this card, I used the From the Garden set, and managed to thoroughly embed the voices from the band Chicago in my head. Can You Dig It? This Timeless Tuesday Challenge was a bingo challenge. Participants choose a row, column or diagonal and include all three elements in a card. I chose the last column: bling, die cut and emboss. I stamped the images on white card stock, and colored them in using my Copics.  I used the Spellbinders' Classic Circle and Parisian Accent dies to cut out and frame the images.  I also paper pieced the gloves, adding a little shading with my Copics.  the bling is from Recollections (Michael's). I stitched around the edge in tight green zig-zags to give my border a finished look. Can You Dig It? Detail Thanks for looking!

Remember when

Image
Remember when life was simple? I'm not sure I do. When you look at these images, please click on them, to see them without the greenish background on my blog. I made this card for the Crafty Girl's Challenge #2 , use two die cuts. I rarely use fewer than two die cuts, so this restraint was not very challenging! Remember When I used a stamp from Heartfelt Creations Mystic Hideaway for the focal. I colored it with my Copic markers, using light pink and warm grays, and then added some texture with my Prismacolor pencils. I framed the image with two dies from Spellbinders' Fleur de Lis Squares , cutting away the center of the inside square with a die from Classic Squares . I love the way the vines on the trellis around the image peek out around the frame. I stitched a piece of patterned paper, which coordinates amazingly well with this image, from a set I bought years ago called Girls to Women, from Busy Scrapper's Solution to a piece of brown card stock for th

Here comes the sun!

Image
This frustrating pop out card took me three tries to excecute, and I'm still not entirely happy with it. I am moving on, though. I learned many things about designing these flip cards, and I'm going to try again now with a simple circle and my new Flourishes stamps. For today, here comes the sun! Here Comes the Sun I used a Spellbinder die for the sun, and some unlabeled tiny letter stamps, but I drew the clouds myself and cut them out on my Silhouette cutter. I'm submitting this one to the Simon Says Stamp! Anything Goes challenge . Have a sunny day! 

Welcome back!

Image
I made this card for the JustRite Friday Challenge #071 . I was really happy with this one, so I also submitted it to the Crafty Friends Challenge . Welcome Back! This week, Challenge Hostess Sheri Holt , chose a photo to inspire us.  It's funny that she isolated the yellow, pink and peach; when I look at that picture, I am most inspired by the greens. I think what makes this image look so inviting is the back-lighted, blurred background, brighter in parts than the focal elements. I tried to capture that, and the colors Sheri selected (plus the greens) in my card. I only discovered the JustRite Original stamps a couple of months ago. I love the way the borders and centers coordinate, and fit into the circular die cut doilies that so fascinate me. All of the JustRite Original stamps are currently being retired; I would be delighted to know when a new release will come out! In this card, I stamped a flower from the now retiring Plant a Little Love Set in brown Memento ink.

You Look Smashing

Image
This one is inspired by the Just Us Girls Challenge blog. Here's the how-to sponge video from Gina K. I watched her stitching on cardstock video as well, before having a go. I love to sponge, so when I saw the Just Us Girls sponging challenge, I hauled out the stencils that I made a few years ago (here is my post " Butterfly Dresses " from 2010). I drew the dress image in Adobe Illustrator, and then cut it out of an overhead transparency (acetate) on my Sihlouette cutter . Then I sponged through the stencil, and stamped over it with a butterfly background stamp (it's unlabeled, so I don't know where it came from). I like the idea of stitching on card stock, so I gave that a try here. I now am certain that I need more colors of thread.  Every time I try a new technique, I end up needing more equipment! I have a confession to make: when I uploaded this card to the challenge, it had fewer elements. I had thought I was done, but changed my mind, and add

Upsy Daisy

Image
I've got one more entry for the "Designer Paper" JustRite Friday Challenge. I'm also going to enter this one in Simon Says Stamp's Flower Challenge . Enamored with the mask-stamp-and-sponge technique I used on " Summer Is Coming! " I decided to give it another go, this time making a daisy chain border. I stamped the daisies from JustRite's My Garden Set with black Memento ink on white paper, and then sponged Bahama Blue Memento ink into the background and shadows. I colored the daisies with my Copic markers, and cut the border and shapes with dies from Spellbinder's Parisian Accents, Floral Doily Accents and Fleur de Lis Accents. I'm still enjoying stamping my own sentiments with JustRite's sytstem. I started to put "Give me your answer true" (as in "Daisy! Daisy!" and the "bicycle built for two" and all that), but I just didn't see anyone using a greeting card to pop the question. So I turned to t

Summer is coming!

Image
I know I live in a warm place, but it was particularly warm and sunny this weekend. I decided a big warm sun would be central to my entry in this week's JustRite Stampers Friday Challenge. The sun shape plays well into my doily obsession, which is still going strong. This week's challenge was to create and use your own stamped "designer paper." I masked and sponged liberally to create the layered look, and then created this fold-out card to make the doily hills really stand out. Summer Is Coming! To make the sun, I stamped a medallion from the JustRite's Kaleidoscope Medallions Set on yellow paper, and then added a very sun-like border from the Smile Set on top, aligned using my stamp alignment system for cheap people (picture of the "Stamp-a-ma-cross" in this post ).  I cut it out with Spellbinders' dies,  Classic Scalloped Circles for the stamped image, and Lacy Circles (from a lighter yellow paper) for the outer layer.  I sponged the two

Floating Away Tag

Image
This week's tutorial on Splitcoaststampers.com is for a technique called Embossed Kisses , in which you ink an embossing folder and pick up the ink on an inked solid colored stamp, and then impress the image on paper. I used Cuttlebug's Paisley embossing folder and a hot air balloon from Local King Rubber Stamps . Floating Away Tag The Embossed Kisses technique worked great, and was very easy to do. It took me 7 or 8 perfectly stamped and then otherwise muddled up balloons to figure out what I was going to make with my image. I learned two things: 1)  Tags are fun to make. Spellbinder accents can make any rectangle look like a tag. I used my new corner rounder, too, which made the tag look a lot more finished than it did with pointy corners. I like the shadows that the embossing gives the shapes I get from Spellbinder Nestabilities. When I cut a rectangle without the dies, it looks terribly flat to me, now. Sponging the edge of the paper helps a lot (and makes the paper

Spring Sprang Sprung!

Image
I made this card for a Justrite Friday Challenge #69, to create a card with spring colors and butterflies. I am enamored with Justrite Stampers at the moment (and Spellbinder dies). Justrite is having a sale , retiring last year's collection, and well, I indulged myself with some new images and borders, including the one I used  in this card. Spring Sprang Sprung! Image from Just Rite Stampers' Plant a Little Love I have been poking around the tutorials on Splitcoaststampers.com for some time now, learning everything as fast as I can. In this card, I used the technique in Beate 's tutorial called Bleached out Images , in which you stamp and emboss the image on colored paper, and then bleach out and color (or not) in the lightened areas. I bleached out the flower, leaves and border in this Justrite image, and used my Copic markers to color it in. Before I bleached out the image, I sponged on some color (to dim the green paper a bit). I usually mask my image whe