Posts

Showing posts from 2012

Picture This!

Image
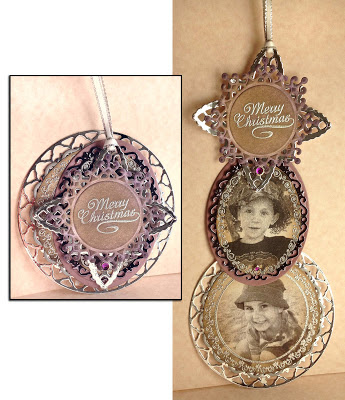
I'm at the end of my semester and thought I'd steal some time to enter a challenge from Justrite stampers. This week, the Justrite Friday Challenge was to include photos in our projects. Merry Christmas from Benjamin and Stuart I used eight different Spellbinders sets in this one! I have always loved how Justrite borders coordinate with Spellbinders dies. In this project I used borders from Justrite Original Beautiful Blossoms and Kaleidoscope Medallions  (which are now retiring and selling for just $5 each!) to stamp and emboss silver borders on my black and white images. The "Merry Christmas" sentiment is from Christmas Vintage Labels 1 . I cut them out with my Spellbinders dies, and sponged with Frayed Burlap Distress Ink to get the sepia tone. The Telescoping card design came from Beate at Splitcoaststampers.com . Inspired by her video, I've made three three telescoping cards, including this one. The first is a goofy tea party , and the second one i

Independence Day

Image
I've heard of Christmas in July; what about Independence Day in October? I made this card for Justrite's Friday Challenge, "Three's Company."  The challenge was to create a card with three coordinating patterns. Let's Celebrate! I used the Justrite Elegant Fronds background stamp and the Justrite Ticking Stripe background stamp  to create my patterned paper. For one pattern, I stamped the Ticking Stripe stamp twice, at right angles, to make a grid, which came out very nicely. For all of them, I used distress ink, and before stamping, I misted the stamp with water. This makes the ink diffuse slightly, appearing more watery and not as crisp. Following Beate John's tutorial on the Spellbinder blog , I cut two of the patterned papers into strips and wove them together, and then cut the resulting weave using Spellbinder dies, to make my frame. I used a Spellbinder border die to cut the blue edging, and sponged it to provide contrast. My sentiment is

Fish!

Image
I'm visiting my mother in Oregon, and thinking about dying some fish fabric for her to use in a quilt. Do you like anchovies?

Class of 2012 Yearbook

Image
The Blockheads Stamp technique challenge this month is to make a little book, using a string for binding. I didn't want to make a blank book, and it took me a long time of sitting in my craft room, before I came up with a theme. I wanted to use  Lost Coast Designs ' set, " Miscellaneous Anthropomorphs ," and after long debate, I decided they would constitute the 2012 graduating class from I.U. (Institution Unknown). Mini-year book I used my Spellbinders dies liberally to cut the shapes for this project. In the  tutorial , the pages were made by folding rectangles. I did that, and then ran them through the die cutter with a circular die. Otherwise, I used the first technique in the tutorial (thanks, Trisha). I stamped the words on the front using  JustRite 's system to make custom text. The crown is Blockhead's Regal Crown from the crown border (which I couldn't find on the site). To make the brown layer on the cover, I cut a circle with a Spellbin

Christmas in July

Image
While I am always looking for new things to make with my stamps and dies, I thought the JustRite Friday Challenge, " Christmas in July ," provides me with a good excuse to revisit the designs which attracted me to JustRite and Spellbinders in the first place. The fussy and ornate layered and bordered designs appeal to me for their detail and symmetry. This design follows  Beate John's tutorial  for making a telescoping card. When I first dove into paper crafting, that video inspired me to make my whimsical Tea Caddy card, which also has that layered fussy look, though it's subject matter is a bit less traditional. This card includes eight circular layers of card stock arranged in three telescoping stacks. I enjoyed coloring directly on the tree stamp from the JustRite Original set, From Our House , and on a border from the (retired) My Grandmother's Doilies sets, and stamping them on glossy card stock. I stamped the santa from the JustRite Original Vintage

Bicycle Built for Two

Image
I bought this set of Mirkwood Designs Bicycle Stamps from Victorine Originals . I seem to be attracted to bicycles; I think it is because of the detailed negative space between the spokes, and the appeal of simple and effective mechanical devices. The Fashionable Stamping Challenge this week is "Let's Get Inky." I've always loved sponging, so I decided to use the embossed resist technique. Bicycle Built for Two Stamps by Mirkwood Designs In addition to the sponged blue background, I inked the edges with a tan Distress Ink, and the scalloped border with gold. I had two Spellbinders revelations in this project. I used one of my Spellbinders border dies as an embossing template and embossed the dots around the edge by hand, using the embossing tool that looks like a stick with a knob on the end. I love the dotted border. For the tag, I used the third largest Romantic Rectangles  die. It was too wide for my sentiment, though, so I made a narrower tag by cutti

Airplane Magnet Tag

Image
My entry in the JustRite Challenge #77, "Tag You're It" is really these Dress Magnet tags , but I colored this other magnet while Benjamin was working on his tag, and decided to include it as well. I'm enjoying this magnet paper, but you have to double it to use it since the magnets are so wimpy. For this one, I cut out two sheets of magnet paper with my JustRite  Vintage Label and Banner Dies , and then stamped the airplane from JustRite's  Going Places  cling set on cardstock. I colored the image and glued the magnet on the back. Then I made the tag/holder for the magnet using a Spellbinders die and the larger die from the  JustRite Vintage Label and Banner Dies . I stamped the image again in mauve and cut it out with a Spellbinder classic circle. Here's the disassembled set: Thanks for looking!

Benjamin's Snowman Tag

Image
Benjamin had such fun entering the JustRite Stars and Stripes Challenge , he wanted to have another go, and enter the JustRite "Tag you're it!" challenge #77 .  Benjamin chose a snowman and border from the Groovy Snowman JustRite Original set. We had a little coloring session, and then he picked the paper and dies for the tag. I assembled it for him this morning, since we ran out of time before bed. Snow Man tag by Benjamin Turnour (age 6)

Magnet Dress Tags

Image
My dress stencil just turned die cut. I'm using the cut-out this time, to make these magnetic dress tags for the JustRite Challenge #77 "Tag you're it!" Magnetic Dress Tags I drew the dresses in Adobe Illustrator and cut them out on my Silhouette cutter (to make stencils, originally, here are some stenciled dresses ). I cut out some dresses from white card stock, and another set from magnet paper. I stamped and sponged them, and then colored them with my Prismacolor Pencils, blending with so called Odorless Mineral Spirits. On the purple dress, I used a stamp from the JustRite Original set called My Garden Set . I love the flowery dress; I was going to do them all in flowers, but I decided to shoot for variety.  The To and From stamps on all three dresses are part of a stamp in the   From Our House Set , and cut out with a die from JustRite's  Vintage Label and Banner Dies . Magnetic Dress Flower Tag On the Christmas dress, I used a snowflake postage

Singing in the rain

Image
I found an illustrator named Tor Freeman on the web. I don't remember what I was searching for, but I have been visiting her blog regularly ever since. I am enchanted with her illustrations, and plan to order her new children's book when it comes out. She made this illustration out if Singing in the Rain, and it inspired me to try one of my own. Oddly enough, this infamous scene of Gene Kelly made it onto the radio news during dinner tonight, although it was a piece about pole dancing. I wonder how Tor Freeman added those rain lines in her drawing?  I wonder how she colored it in?  I scanned in my image and printed it out before coloring it in, so I might have another go. Maybe I'll use Photoshop instead of markers next time, just for fun. Wait, that Photoshop coloring idea was much easier that I thought it would be, and I've done it already. It's too soon for another blog entry, so I'll just stick it in here. What do you think, rain (right) or no ra

Would you like some T?

Image
Maybe I should stick to Clean And Simple (CAS) cards. I have such a time deciding to add all those ribbons and rhinestones that the ladies favor when they participate in the challenges I follow. This week's challenge from the CAS-ual Friday Challenge Blog is to use text on your card.  I'm sure this is not what they had in mind! Would you like some T? Would you like some T? I got both the alphabet and the tea pot out of the dollar bin at Michaels; I do not know the manufacturer.  I showed it to my husband, saying, "Look, I made a joke." He stared blankly at it. My son Benjamin said, "Why are there nails coming out of that teapot?" Sigh. D'ya get it? You know, it's T!  Thanks for looking!

Star Lady dresses for the 4th of July

Image
Star Lady decided to forgo tradition for this year's 4th of July party. She reached into the back of her closet and pulled out her most festive pair of lederhosen. I have so many more JustRite stamps than I did last time I entered a Friday Challenge that I had a hard time choosing which ones to use for the Stars and Stripes Friday Challenge project. Star Lady's lederhosen were made from the Stitched Ribbon Background Stamp with suspenders and rhinestone studded belt from the matching border in the Classic Scallop Borders One set. Her party hat is another of the border stamps in that same set. Star Lady accessorizes with a handbag stamped "Live your dreams," from the Going Places Vintage Labels set, a sentiment that she felt somehow justifies her outlandish choice in wardrobe. Her purse dangle is a Tibetan Silver cat charm. ( Tibetan silver is a zinc alloy that is made into charms and findings in China and sold on ebay for very good prices (though it comes

Make a wish card

Image
"What are you doing, Mommy?" "Looking at my computer." "But *what* are you looking at?" "This company has card making contests on their website. You make a card and then take a picture of it and link it into their site." "But what happens to the card?" "You keep it." "WOW! You get to enter the contest AND keep the card?! I want to do that. What do I do?" Look out JustRite Friday Challenge Number 76 , here comes Benjamin! The theme this week is stars and stripes. Benjamin sorted through all the JustRite stamps I have and picked out the Make a Wish sentiment from a retired JustRite Original card making set (because of the stars). I told him he had to start with a sketch. He drew this (and we accidentally used it as a place mat when we sponged red ink onto a die cut). He described it to me very carefully. He wanted a star shaped card, with stripes radially out from the the sentiment in the center, and s

Come into My Garden

Image
I made this project using the shirt stencil I talked about here . This time, I cut the stencil out of acetate (an overhead transparency) so that I can wash it off.  The stamps are from Blockheads Stamps , which inspired me to use the embossed resist technique with their technique challenge (see below). I like the results so much, I also entered them into the Stamp Man's Favorite Technique Challenge . My favorite technique definitely has to do with sponging with stencils. Come into My Garden I used two Calendula stamps for this card, the full plant on the frame, and a single flower for the shirt. I used Justrite Stampers (retired) font system to write "come into my," and added the word Garden from this Blockheads set (I should have gotten the bigger bunch of tulips! Next time...) I stamped the single flower through the stencil and embossed the image with clear embossing powder. I replaced the stencil and sponged (and brushed) ink to reveal the flowers. I did th

Shirt Tag

Image
I drew a Hawaiian Shirt (two days after the challenge that inspired me was over) and made a stencil. Then I used the embossed resist technique to decorate it with white flowers. The stamp is from Inkadinkado. Hawaiian Shirt Tag I'm going to make a few more shirts, but I was happy enough with this first go to show it off. I love to sponge through stencils. Fabric seems to come out extremely well with this technique. In addition to this shirt, I've also made an apron and a dress . This shirt is actually three stencils. Here are the outlines: Shirt stencils If you want to use my stencils to make your own wardrobe, and have a cutter that can cut from an Adobe Illustrator file, I'd be happy to share. Shoot me a message. Thanks for looking!