Posts

Showing posts with the label die cutting

Koi Part 1

Image
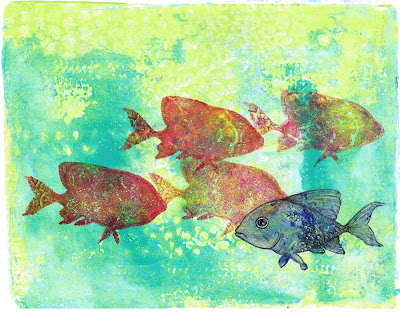
In the workshop Creative Jumpstart that I am doing, yesterday's lesson involved acrylic spray paint, which is (no I'm not kidding) an art supply that I didn't own (yes, I got some). The video by Michelle Ward made it look like so much fun, I thought a little spray paint could be fun to own.  It was actually on sale at Michaels; I think they are downsizing since only the weird colors were on sale. I got a few but I haven't used them yet, since, in an odd turn of events, it is raining making my well ventilated (back yard) work area soggy. In the meantime, I decided to try the activity with Dylusions sprays.  I cut fish stencils out of printer paper and then sprayed them with a waterproof sealant (since I was pretty sure I'd be drowning them in ink).  Some of my prints worked well, without much leakage under the stencil, but I like the bright colors you get by soaking the paper so I chose this one, which was not an excellent print. After writing on it with Permap...

Gelli Prints

Image
I made some new stencils to Gelli Print though. On this one, I drew on the print with black and white pen. I like the tree stencil, but I'm enjoying using the cut-out portion of it as a mask more. And last, here are some birds. I know many people use their Gelli Plate prints for collage, so this isn't revolutionary, but after printing with my stencils for a while, I notice that the masks look like they'd make great collage elements. Does anyone cut and then print on the little bits? Or does everyone print and then cut? I make my stencils from overhead projector slides. These are the masks Thanks for looking!

Creative Chemistry 102 Day 2 Butterfly

Image
OK, so it is already Day 5, but I had so much work to do. I'm taking a break from it to try some more of the techniques in Tim Holtz's Creative Chemistry 102 class. Day 2 focussed on stencils, one of my favorite tools. I like cutting my own stencils from transparency paper, which is slick and easy to sponge through, and thin enough to stamp through. This time, however, I used a stencil from Crafter'sWorkshop. I made two samplers, and pasted them to the two sides of this middle sized butterfly. I was inspired by Tim's choice of blue and brown, but decided that I was in a green mood, and chose Distress Ink in Evergreen Bough and Vintage Photo instead. I like the speckled appearance made from little specks of clear embossing powder. Here's a close-up. Here's the start of my butterfly mobile project , including a butterfly made using Distress Paint as a resist, and here is a butterfly made using Distress Paint to create a faux patina look. Maybe there...

The butterflies are coming!

Image
For some reason, the media (magazine articles, books and so on) about mixed media art seems to be half techniques, tools and materials, and half self help (egging the reader to have, for example, "the courage to create"). I am interested in the former, being already brave in the face of art supplies. I welcome recommendations for books, tutorials, blogs (yours?) or whatnot related to mixed media. My own next mixed media undertaking is underway. I began by drawing butterflies and cutting them out on my Silhouette cutter. I cut black butterflies a tiny bit larger, to matte these. I glued four black ones together to make a thicker more sturdy element. They are exactly the same shape, thanks to the cutter, and layered easily. My plan is to hang these from their holes. Next I decorated four white ones, and glued them to the front and back of two of my thick black butterflies. Here's one side: I stamped the flowers using Distress Paint, and then used Distress Stain ...

Flower Collage

Image
I made this Justrite Flower Collage for the JustRite Friday Challenge #102 . Justrite Flower Collage - by Florence Turnour It is a color challenge, with the colors shown here.  Miss Sheri (challenge hostess), I really was trying to hit the colors, honest, but my yellow turned gold.  I think I was afraid the Easter Bunny might come hopping and eat up my flowers if I stuck too close to his pallet. For the leaves, I used Justrite's Elegant Frond background stamp with black embossing powder, cut out with a retired Spellbinders set called Flower Creations, and painted with Twinkling H2Os.  The flowers are doilies from a retired Justrite Original set, similarly embossed and painted. The barely visible background behind the liquid pearl dots is Beka Feeken's vintage alphabet . I framed the background using a Spellbinders Majestic Squares die cut frame painted with a metallic Distress Paint.  Thanks for looking!

Early Spring

Image
Everyone around me seems to think it is Spring all of a sudden. Three of the challenges that I follow, if not actually enter, are asking for Spring themed cards. The farmer's market was packed, and even the grocery store seemed busier than usual. I made this card for the   Justrite Stampers  Friday Challenge, "Suddenly Spring." (Nice name.) Early Spring I used the retired Justrite Original Nature's Nested set for my sentiment, cropping to feature the words "early Spring." The frame is stamped with a stamp from the Kindness set . Early Spring sentiment I cut out the butterflies with Cheery Lynn's Exotic Butterflies medium and small from the middle of a sheet of paper. Then I inked gold onto the butterflies and stamped the background with Justrite's Elegant Fronds background stamp (my favorite background) several times to cover the full area of the card. I cut out the card using a Spellbinder's Grand Calibur die, and sponged the edges ...

Celebrate!

Image
Celebrate! Why not? I had a great time going to the Anaheim Scrapbook Expo with my friends last weekend. I decided to use Justrite Friday Challenge to try out some of the products I purchased. Here's my card, "Celebrate!" Celebrate! Justrite Friday Sketch Challenge #090 This is my second sketch challenge. I'm still getting the hang of it, which in my case means I pretty much copied the sketch. My favorite new item so far is the glittered embossing powder I bought from  Sparkle N Sprinkle . I have long wanted to glitter my stamped images, and I've done it with the glue stamp pad, but what a pain to clean the stamps and myself and my work area.  I shy away from that glue every time I think of using it. The Sparkle N Sprinkle product is embossing powder infused with glitter leaving the image both crisp and sparkly. Neither the pictures in the Sparkle N Sprinkle shop that I linked to above, nor these pictures of my card really do a great job showing the glit...

Enjoy

Image
I made this card for a Unity Kit Club Sketch Challenge. After writing this post, I figured out that I missed the deadline for the challenge. Sad sad. So I'm entering it into the Fashionable Stamping Challenge ( Surprise Us ) and Simon Says Stamp Challenge ( Anything Goes , along with 500 other people), and Loves Rubber Stamp Challenge Blog ( Anything Goes ). December 2012 Unity Sketch Challenge I've not managed to use a card sketch before, though I like the idea of having a plan before I start pasting. I actually bought a book of sketches that I like to look at, but still I have yet to actually put shapes in the places they suggest on a card.  In any case, this time I wanted to play along on the Unity Stamp Blog, since I bought some Unity Kit stamps.  So I gave it a go. I made this card to hold these earrings I made for a fellow beader, as part of a new year's earring exchange. (I hope she doesn't look at my blog before I get them mailed off!) The earrings mak...

Picture This!

Image
I'm at the end of my semester and thought I'd steal some time to enter a challenge from Justrite stampers. This week, the Justrite Friday Challenge was to include photos in our projects. Merry Christmas from Benjamin and Stuart I used eight different Spellbinders sets in this one! I have always loved how Justrite borders coordinate with Spellbinders dies. In this project I used borders from Justrite Original Beautiful Blossoms and Kaleidoscope Medallions  (which are now retiring and selling for just $5 each!) to stamp and emboss silver borders on my black and white images. The "Merry Christmas" sentiment is from Christmas Vintage Labels 1 . I cut them out with my Spellbinders dies, and sponged with Frayed Burlap Distress Ink to get the sepia tone. The Telescoping card design came from Beate at Splitcoaststampers.com . Inspired by her video, I've made three three telescoping cards, including this one. The first is a goofy tea party , and the second one i...

Independence Day

Image
I've heard of Christmas in July; what about Independence Day in October? I made this card for Justrite's Friday Challenge, "Three's Company."  The challenge was to create a card with three coordinating patterns. Let's Celebrate! I used the Justrite Elegant Fronds background stamp and the Justrite Ticking Stripe background stamp  to create my patterned paper. For one pattern, I stamped the Ticking Stripe stamp twice, at right angles, to make a grid, which came out very nicely. For all of them, I used distress ink, and before stamping, I misted the stamp with water. This makes the ink diffuse slightly, appearing more watery and not as crisp. Following Beate John's tutorial on the Spellbinder blog , I cut two of the patterned papers into strips and wove them together, and then cut the resulting weave using Spellbinder dies, to make my frame. I used a Spellbinder border die to cut the blue edging, and sponged it to provide contrast. My sentiment is ...

Class of 2012 Yearbook

Image
The Blockheads Stamp technique challenge this month is to make a little book, using a string for binding. I didn't want to make a blank book, and it took me a long time of sitting in my craft room, before I came up with a theme. I wanted to use  Lost Coast Designs ' set, " Miscellaneous Anthropomorphs ," and after long debate, I decided they would constitute the 2012 graduating class from I.U. (Institution Unknown). Mini-year book I used my Spellbinders dies liberally to cut the shapes for this project. In the  tutorial , the pages were made by folding rectangles. I did that, and then ran them through the die cutter with a circular die. Otherwise, I used the first technique in the tutorial (thanks, Trisha). I stamped the words on the front using  JustRite 's system to make custom text. The crown is Blockhead's Regal Crown from the crown border (which I couldn't find on the site). To make the brown layer on the cover, I cut a circle with a Spellbin...

Christmas in July

Image
While I am always looking for new things to make with my stamps and dies, I thought the JustRite Friday Challenge, " Christmas in July ," provides me with a good excuse to revisit the designs which attracted me to JustRite and Spellbinders in the first place. The fussy and ornate layered and bordered designs appeal to me for their detail and symmetry. This design follows  Beate John's tutorial  for making a telescoping card. When I first dove into paper crafting, that video inspired me to make my whimsical Tea Caddy card, which also has that layered fussy look, though it's subject matter is a bit less traditional. This card includes eight circular layers of card stock arranged in three telescoping stacks. I enjoyed coloring directly on the tree stamp from the JustRite Original set, From Our House , and on a border from the (retired) My Grandmother's Doilies sets, and stamping them on glossy card stock. I stamped the santa from the JustRite Original Vintage ...