What I've learned about resin so far
I posted some buttons I made using resin a while back. In this post I share some of the things I learned about using resin in the process.
Resources:
I got interested in using resin by reading this article in Bead Style magazine:
Stir Up Some Sweet Delights, by Steven James
I tried it after reading this tutorial:
Beading Daily Tutorial
Be sure to watch the video at the bottom.
There is a book that looks quite good by Sherri Haab; I have not yet purchased it, but when I get stuck into my Christmas ornament projects, I probably will.
There's a nice video on You-tube here: Making Resin Rings by John Golden
Easy Cast Clear Casting Resin
I used Easy Cast Clear Casting Resin, which I bought from a seller on ebay once and at Michael's once.
About having to wait: Although it is hard to wait that long to see if my latest experiment worked, I was not always neat and tidy when I did my projects, and with this slow curing resin, after about 12 hours, the resin was hard enough to, for example, scrape off the drips and drops. After 24 hours, the resin was so hard, the only way to remove unwanted spills is with sand paper.
About bubbles: This product "self degasses" which means the bubbles all pop themselves a few minutes after finishing all that stirring.
Castin' Craft Easy Mold
I made the molds for these gears using Castin' Craft Easy Mold and some Legos. I colored them after they were cured by putting them in a small zip lock bag with some metallic Ranger alcohol ink. You can scratch the color with your fingernail, but if you don't do that, that method of adding color on resin works well.
You can make a mold of just about anything from this fascinating stuff. You kneed equal parts (imprecisely) of two clays, press in your object, and three minutes later, you have a perfect detailed mold. You either leave it over night, or bake it for 30 minutes and it is ready to use. I once used the bottom of a round flat battery to get a disk mold and found that the little tiny itty bitty numbers on the battery showed up on the resin disk that I made from the mold. The detail was impressive (and inconvenient). The resulting mold is flexible, so you can always easily remove your cast object. Apparently the stuff is food-safe, and also used for candy. I didn't try it.
Other materials
Look at the Beading Daily article above if you have not already. They contain the resin with a bezel frame and some sticky tape.
The frame
I wanted to make buttons, so instead of a bezel, like Jean used in the tutorial, I used plain round rings. In the beading world, these are either rings (as for your fingers) or links (as from a chain, which you can buy unlinked). I do not want to make my resin projects with sterling sliver, for a variety of reasons, but mostly because it tarnishes, and I'd bet the resin would not fair well with the silver polish.
I had luck with the following:
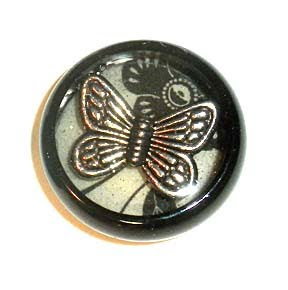
The Butterfly Buttons are framed with black agate rings. They were very easy to make. I out circles from black and white patterned card stock. Then I mixed the resin and poured about 1/8 of an inch in each ring (stuck firmly on sticky tape). I put in the card stock circles, covered them with a little more resin and let them cure. I added the butterfly beads (Tibetan Silver) and another layer of resin the next day. I am not sure I needed to wait to put in the butterfly beads, but since they were quite heavy, I was worried that they would push the cardstock onto the sticky tape, and I decided that I wanted a thicker layer of resin on the back than that. I have yet to add the shank to these buttons.
I used a men's stainless steal ring (1 mm width) to frame my spice buttons. I colored the resin in this Spice Button with sage; I also used cinnamon, curry, cayenne pepper and turmeric. The Beading Daily video in the link above has a lot of ideas for coloring resin; this was one of them. The embellishment is Tibetan Silver.
Searching for any of the above on ebay will yield an enormity of inexpensive options.While I did not have luck with it as of yet, I am optimistic about this last frame option:
I up-sized the same technique to make this Christmas ornament, using a bangle as a frame. I had several problems along the way, and need to experiment more with this. One successful idea is to use a bead to make a hole in the final piece. I stuck the very topmost bead in the tree down to the tape before I poured the resin. So the hole in that bead goes through the piece. This technique would work well to leave a hole in a smaller disk as well, to make, for example, a pendant. This ornament is not that pretty in person; the idea is good, but the execution needs work.
I found a pack of girl's aluminum bangles at Walmart that are a very nice size. The key thing is that your frame must sit flat on the tape, so that the resin does not leak out. Whatever frame you choose, make sure it is flat on one side. I am going to cut some Christmas shapes out of paper using my Silhouette cutter and plop them into those to make some easy ornaments.
The sticky tape
Things that don't work well:
My best results were from
What to put into the resin
You can stick virtually anything into resin. Here are some coloring ideas I tried. The Beading Daily link above has more.

I love the idea of using shrinky dinks, but I used Sharpy pens to color the shrinky dink fish here. As you can see, they bled into the resin. I have not tried other permanent markers yet. Probably a fixative of some sort would do the trick as well.
Tip about including paper into resin
In the video listed above John Golden suggests coating the paper in Mod Podge before adding it to the resin. If you haven't discovered Mod Podge, get some. It's amazing stuff.
Enjoy!

Resources:
I got interested in using resin by reading this article in Bead Style magazine:
Stir Up Some Sweet Delights, by Steven James
I tried it after reading this tutorial:
Beading Daily Tutorial
Be sure to watch the video at the bottom.
There is a book that looks quite good by Sherri Haab; I have not yet purchased it, but when I get stuck into my Christmas ornament projects, I probably will.
There's a nice video on You-tube here: Making Resin Rings by John Golden
Easy Cast Clear Casting Resin
I used Easy Cast Clear Casting Resin, which I bought from a seller on ebay once and at Michael's once.
- With this product, you measure equal parts of the hardener and the resin.
- After combining the resin and the hardener, the mixture must be stirred for 2 minutes, moved to a clean container, and stirred for another minute.
- This product cures in 24 hours.
About having to wait: Although it is hard to wait that long to see if my latest experiment worked, I was not always neat and tidy when I did my projects, and with this slow curing resin, after about 12 hours, the resin was hard enough to, for example, scrape off the drips and drops. After 24 hours, the resin was so hard, the only way to remove unwanted spills is with sand paper.
About bubbles: This product "self degasses" which means the bubbles all pop themselves a few minutes after finishing all that stirring.
Castin' Craft Easy Mold
I made the molds for these gears using Castin' Craft Easy Mold and some Legos. I colored them after they were cured by putting them in a small zip lock bag with some metallic Ranger alcohol ink. You can scratch the color with your fingernail, but if you don't do that, that method of adding color on resin works well.
 |
| Resin Gears |
Other materials
Look at the Beading Daily article above if you have not already. They contain the resin with a bezel frame and some sticky tape.
The frame
I wanted to make buttons, so instead of a bezel, like Jean used in the tutorial, I used plain round rings. In the beading world, these are either rings (as for your fingers) or links (as from a chain, which you can buy unlinked). I do not want to make my resin projects with sterling sliver, for a variety of reasons, but mostly because it tarnishes, and I'd bet the resin would not fair well with the silver polish.
I had luck with the following:
- Agate rings (I like the black ones)
 | |
| Butterfly Buttons |
- Stainless steal rings
 |
| Spice Button |
- Tibetan Silver links
Searching for any of the above on ebay will yield an enormity of inexpensive options.While I did not have luck with it as of yet, I am optimistic about this last frame option:
- A plain bangle
 |
| Christmas Ornament |
I found a pack of girl's aluminum bangles at Walmart that are a very nice size. The key thing is that your frame must sit flat on the tape, so that the resin does not leak out. Whatever frame you choose, make sure it is flat on one side. I am going to cut some Christmas shapes out of paper using my Silhouette cutter and plop them into those to make some easy ornaments.
The sticky tape
Things that don't work well:
- Avoid contact paper.
- Avoid overlapping stirps of tape.
- Avoid duct tape.
My best results were from
- Scotch clear packaging tape.
What to put into the resin
You can stick virtually anything into resin. Here are some coloring ideas I tried. The Beading Daily link above has more.
- Acrylic paint, which sells at Joann's for $0.59 per bottle. I dipped a skewer into the paint, wiped it off a bit and used it to stir up the resin for some very bright translucent colors.

- Spices (the results still smell very slightly)
- Microbeads (from Matrtha Stewart)
 |
| My first buttons (See my post here) |
- Flocking to make bright opaque colors
- Powders (chalk, eyeshadow) also to make opaque colors
- Objects of all sorts
- Pictures of things
- Shrinky dinks
 | |
| Fish Button |
Tip about including paper into resin
In the video listed above John Golden suggests coating the paper in Mod Podge before adding it to the resin. If you haven't discovered Mod Podge, get some. It's amazing stuff.
Enjoy!
These are very cool!
ReplyDeleteI like that the ink bled into the resin. Nice effect. Great blog BTW Had to sign up
ReplyDeleteThis is wonderful, and very creative information. I am so glad I stumbled across it!
ReplyDelete