Colored pencils
I dug my colored pencils out of the art supplies box in the garage. It has been fun to look at all the ways that the stamping community uses them. I've been testing the techniques for myself; here's what I've tried:
In the project above, I stamped two copies of the image. I colored the hats on one, and the wooden racks on the other, and cut them out to assemble them on a new sheet of white paper. When coloring the images, I used Prismacolor colored pencils and blending pencil, Mona Lisa odorless mineral spirits and a fine line black pen. Here are some things that I learned.
Cut it out
I like not having to stay in the lines when I color, and especially when I blend, but I like having stayed within the lines when the project is done. Paper piecing is the perfect solution to this. If you plan to cut the image out, you can color right over those edges without worry.
When you are planning to cut out an image, add what printers call bleed to the edges of the image. Systematically extend the color along the edges onto the white part of the paper, so that you don't need to cut so precisely to get a clean finish. The sharpness in the hats in this project comes largely from the dark inked edge, which I widened with my pen, and then trimmed off when I cut it out.
After cutting out the image, apply color to the white edges of the image. I used ink, since I had dark edges to my image to start with, but I can see using the pencils for this as well. When I did this, I put the cut-out on a scrap of dark card stock, so I could see the white edges.
I also learned that paper pieced images look better when they are layered in the order that the objects are in the image. For example, I colored the green hat as if the rack were not there, and then I glued the hat rack on top. The rack actually goes into the hat through a small slit at the top.
Black and white
I came to this from watercolor painting years hence, and I tend to be reluctant to use either white or black. White in watercolor is just plain cheating (you are supposed to leave the paint off the white parts), and black makes the otherwise translucent colors muddy. Not so with pencils. Colored pencils do not mix like watercolors. Blending the bright colors with the colorless blender or by applying mineral spirits smooths the color together, but eliminates much of the contrast. With the black and white pencils in addition to the colors, I changed the tones, darkened the edges and added shine.
Smudge the ink
Following Lydia's Blended Pencil tutorial I listed above, I did not despair when all of my blending and smudging pretty much obscured the detail in the original stamped image. Once I figured out I should use the black (and indigo) and white pencils, I could get contrast, but not definition. So I watched Lydia add the ink to her drawing, effortlessly saying that you really didn't have to be careful. Well, you have to be a little bit careful. I put on too much ink not always in the right places.
It turned out to be a happy accident, however. With nothing else to do but start over, I went at the inked image again with the pencils. Wow, that turned out to be a great idea. The waxy finish of the pencils allows the ink to move around even when it is dry. I was able to change my scribbles into blocks of shading.
Step 1: Stamp, color and blend
Step 2: Ink
Step 3: Blend with pencils and colorless blender (not mineral spirits)
Step 4: Cut and paste
Thank you Lydia, for the inspiration. That was fun. What I need now is a good pencil sharpener. Any suggestions?
- Blending with an odorless paint thinner (I used Mona Lisa brand), following this tutorial SplitcoastStampers Tutorial: Copics with Pencils though I put so much colored pencil, my copic coloring shows through not at all.
- Blending with a colorless blender (which is a colorless colored pencil that adds the waxy medium to your drawing and helps burnish and blend; mine came in a pack of two from prismacolor)
- Adding ink outlines, following this tutorial SplitcoastStampers Tutorial: Blended Pencils.
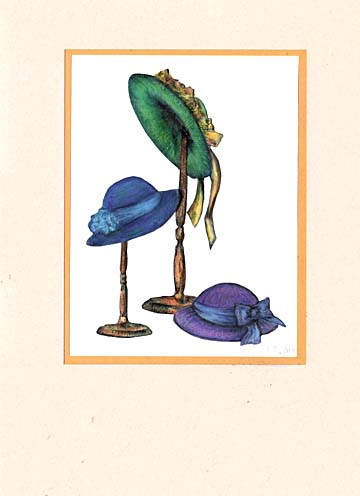  |
| Hats: Image by Aunty Amy (I Brake for Stamps!) |
In the project above, I stamped two copies of the image. I colored the hats on one, and the wooden racks on the other, and cut them out to assemble them on a new sheet of white paper. When coloring the images, I used Prismacolor colored pencils and blending pencil, Mona Lisa odorless mineral spirits and a fine line black pen. Here are some things that I learned.
Cut it out
I like not having to stay in the lines when I color, and especially when I blend, but I like having stayed within the lines when the project is done. Paper piecing is the perfect solution to this. If you plan to cut the image out, you can color right over those edges without worry.
When you are planning to cut out an image, add what printers call bleed to the edges of the image. Systematically extend the color along the edges onto the white part of the paper, so that you don't need to cut so precisely to get a clean finish. The sharpness in the hats in this project comes largely from the dark inked edge, which I widened with my pen, and then trimmed off when I cut it out.
After cutting out the image, apply color to the white edges of the image. I used ink, since I had dark edges to my image to start with, but I can see using the pencils for this as well. When I did this, I put the cut-out on a scrap of dark card stock, so I could see the white edges.
I also learned that paper pieced images look better when they are layered in the order that the objects are in the image. For example, I colored the green hat as if the rack were not there, and then I glued the hat rack on top. The rack actually goes into the hat through a small slit at the top.
Black and white
I came to this from watercolor painting years hence, and I tend to be reluctant to use either white or black. White in watercolor is just plain cheating (you are supposed to leave the paint off the white parts), and black makes the otherwise translucent colors muddy. Not so with pencils. Colored pencils do not mix like watercolors. Blending the bright colors with the colorless blender or by applying mineral spirits smooths the color together, but eliminates much of the contrast. With the black and white pencils in addition to the colors, I changed the tones, darkened the edges and added shine.
Smudge the ink
Following Lydia's Blended Pencil tutorial I listed above, I did not despair when all of my blending and smudging pretty much obscured the detail in the original stamped image. Once I figured out I should use the black (and indigo) and white pencils, I could get contrast, but not definition. So I watched Lydia add the ink to her drawing, effortlessly saying that you really didn't have to be careful. Well, you have to be a little bit careful. I put on too much ink not always in the right places.
It turned out to be a happy accident, however. With nothing else to do but start over, I went at the inked image again with the pencils. Wow, that turned out to be a great idea. The waxy finish of the pencils allows the ink to move around even when it is dry. I was able to change my scribbles into blocks of shading.
 | |
| Smudging ink with colored pencils: Image by Impression Obsession |
 |
| Hold onto Your Hat: Images by Impression Obsession (hat) and Rubber Monger (wind) |
Step 1: Stamp, color and blend
Step 2: Ink
Step 3: Blend with pencils and colorless blender (not mineral spirits)
Step 4: Cut and paste
Thank you Lydia, for the inspiration. That was fun. What I need now is a good pencil sharpener. Any suggestions?
WOW!!! This is one of the best tutorials I've ever seen! Thank you so much for sharing!
ReplyDeleteI had NO idea you could blend the ink - absolutely brilliant.
Those hats look positively real. Beautifully done.
PS - funny you talk about coloring outside the lines and piecing - I'm uploading a video right now where I talk about just that... :)
I love the hat blowing in the wind. Beautiful
ReplyDeleteThis was fantastic!! Thanks for sharing and the hats are awesome
ReplyDeleteTFS! Great tutorial!
ReplyDelete