Keeping cards clean while Gelli printing
I printed on my Gelli Plate some greeting cards the other day, and it took me quite a few tries to figure out how to get coverage all the way to the edge without getting the back and inside of the card dirty. Here's how I did it.
Step 1. Ink the plate. In this picture, I only inked about three quarters of the 8"x10" plate because I was making 5"x7" cards. I placed a stencil (black) onto the paint (pink).
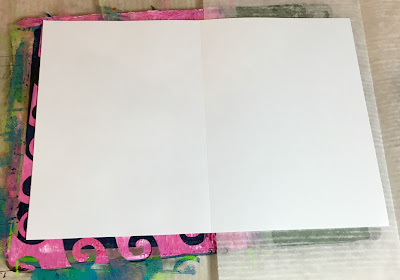
Step 2. Cover the part of the plate that you don't want to print. For me this included the part without paint on it. I used a sheet of deli paper.
Step 3. Fold the card, and place the card on the deli paper, back side down, so only a small part of the back of the card sticks over onto the paint. This will allow the print to wrap around to the back of the card slightly. In the picture, I zoomed in on the top corner of the card, so you can see the slight overlap onto the paint. The front of the card is face up in the photo.
Step 4. Unfold the card, so the front of the card goes on the paint. It will stick there, so you can let go for a moment.
Step 5. To keep from getting that paint that shows around the edge all over the place, put another piece of paper over the whole thing. Apply pressure to make the print. I used deli paper for this too.
Step 6. Remove the deli paper and pull up the card. Ta da! It's done.
Two more comments:
- My ghost prints didn't come out that great, and I stopped pulling them on greeting cards after a while. I think it was because I was moving slowly to be careful not to get paint everywhere, and it dried out too much to make a nice ghost.
- I set the two painty pieces of deli paper aside, and used clean ones for the next print. After about three cards, the deli paper I used for the first card was dry and I could use it again safely. So I didn't actually use up two sheets of deli paper for each card.
Have fun! Thanks for looking.


Thanks, Florence. Very easy to understand.
ReplyDeleteGreat tips!
ReplyDeleteThanks for sharing!!
ReplyDeleteWonderful, thanks for the tips!
ReplyDeleteNice technique.
ReplyDeleteNice technique.
ReplyDeleteVery nice!
ReplyDeletethank you for this trick ... l will use it straight away. Solves my biggest problem. Thank you :)
ReplyDeletea simple solution for a big problem...thanks for the tip
ReplyDeletea simple solution for a big problem...thanks for the tip
ReplyDeleteExcellent technique and really clear explanation. Thanks
ReplyDeleteperfect timing...i just started making cards today and got paint on backs and insides. thank you so much for sharing these clear instructions.
ReplyDeleteBeautiful cards and love the idea. Thanks!
ReplyDeleteCouldn't you just make a pocket for the clean half? Insert the clean side of the card into the pocket and print on the other side. Maybe make up several of them so the paint can dry while you move on to the next card. You could use any scrap paper for the pocket. Hope this is helpful!
ReplyDeleteYes, that sounds like it would work. Maybe give it a try?
DeleteThanks for the information - this is always a problem!
ReplyDeleteGreat tips, wonderful tutorial! Thanks
ReplyDeleteThank you Florence for this great tip. I was wondering how to do this - I have just bought a Gelli plate so it is all a big learning curve.
ReplyDeleteThank you for this great tip. Your cards are beautiful.
ReplyDeleteSometimes for me the water in the paint makes the paper warp and the card does not fold flat or lie flat. How do you compensate for this? Thank you.
ReplyDeleteI'm gonna try this...thanks!
ReplyDeleteThank you for sharing this tip! Do you put the cards under something heavy after they are dry to prevent curling edges?
ReplyDeleteVery helpful. Thank you for taking the time to post this.
ReplyDelete