Posts

Showing posts with the label embossed resist technique

Creative Chemistry 102 Day 2 Butterfly

Image
OK, so it is already Day 5, but I had so much work to do. I'm taking a break from it to try some more of the techniques in Tim Holtz's Creative Chemistry 102 class. Day 2 focussed on stencils, one of my favorite tools. I like cutting my own stencils from transparency paper, which is slick and easy to sponge through, and thin enough to stamp through. This time, however, I used a stencil from Crafter'sWorkshop. I made two samplers, and pasted them to the two sides of this middle sized butterfly. I was inspired by Tim's choice of blue and brown, but decided that I was in a green mood, and chose Distress Ink in Evergreen Bough and Vintage Photo instead. I like the speckled appearance made from little specks of clear embossing powder. Here's a close-up. Here's the start of my butterfly mobile project , including a butterfly made using Distress Paint as a resist, and here is a butterfly made using Distress Paint to create a faux patina look. Maybe there...

Celebrate!

Image
Celebrate! Why not? I had a great time going to the Anaheim Scrapbook Expo with my friends last weekend. I decided to use Justrite Friday Challenge to try out some of the products I purchased. Here's my card, "Celebrate!" Celebrate! Justrite Friday Sketch Challenge #090 This is my second sketch challenge. I'm still getting the hang of it, which in my case means I pretty much copied the sketch. My favorite new item so far is the glittered embossing powder I bought from  Sparkle N Sprinkle . I have long wanted to glitter my stamped images, and I've done it with the glue stamp pad, but what a pain to clean the stamps and myself and my work area.  I shy away from that glue every time I think of using it. The Sparkle N Sprinkle product is embossing powder infused with glitter leaving the image both crisp and sparkly. Neither the pictures in the Sparkle N Sprinkle shop that I linked to above, nor these pictures of my card really do a great job showing the glit...

Enjoy

Image
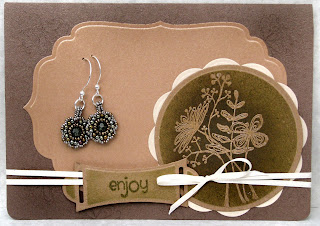
I made this card for a Unity Kit Club Sketch Challenge. After writing this post, I figured out that I missed the deadline for the challenge. Sad sad. So I'm entering it into the Fashionable Stamping Challenge ( Surprise Us ) and Simon Says Stamp Challenge ( Anything Goes , along with 500 other people), and Loves Rubber Stamp Challenge Blog ( Anything Goes ). December 2012 Unity Sketch Challenge I've not managed to use a card sketch before, though I like the idea of having a plan before I start pasting. I actually bought a book of sketches that I like to look at, but still I have yet to actually put shapes in the places they suggest on a card.  In any case, this time I wanted to play along on the Unity Stamp Blog, since I bought some Unity Kit stamps.  So I gave it a go. I made this card to hold these earrings I made for a fellow beader, as part of a new year's earring exchange. (I hope she doesn't look at my blog before I get them mailed off!) The earrings mak...

Bicycle Built for Two

Image
I bought this set of Mirkwood Designs Bicycle Stamps from Victorine Originals . I seem to be attracted to bicycles; I think it is because of the detailed negative space between the spokes, and the appeal of simple and effective mechanical devices. The Fashionable Stamping Challenge this week is "Let's Get Inky." I've always loved sponging, so I decided to use the embossed resist technique. Bicycle Built for Two Stamps by Mirkwood Designs In addition to the sponged blue background, I inked the edges with a tan Distress Ink, and the scalloped border with gold. I had two Spellbinders revelations in this project. I used one of my Spellbinders border dies as an embossing template and embossed the dots around the edge by hand, using the embossing tool that looks like a stick with a knob on the end. I love the dotted border. For the tag, I used the third largest Romantic Rectangles  die. It was too wide for my sentiment, though, so I made a narrower tag by cutti...

Come into My Garden

Image
I made this project using the shirt stencil I talked about here . This time, I cut the stencil out of acetate (an overhead transparency) so that I can wash it off.  The stamps are from Blockheads Stamps , which inspired me to use the embossed resist technique with their technique challenge (see below). I like the results so much, I also entered them into the Stamp Man's Favorite Technique Challenge . My favorite technique definitely has to do with sponging with stencils. Come into My Garden I used two Calendula stamps for this card, the full plant on the frame, and a single flower for the shirt. I used Justrite Stampers (retired) font system to write "come into my," and added the word Garden from this Blockheads set (I should have gotten the bigger bunch of tulips! Next time...) I stamped the single flower through the stencil and embossed the image with clear embossing powder. I replaced the stencil and sponged (and brushed) ink to reveal the flowers. I did th...