Posts

Showing posts from 2013

Monoprinting without a press

Image
I am now the proud owner of another craft tool, the Gelli Plate .  They have a very active facebook page, and after watching interesting image after image go by, I finally gave in and ordered it. I love stencils and am excited to have another incentive to make them. I have made stencils before, using old overhead transparencies in my Silhouette electronic cutter, for use on paper, with stamps and for use on fabric, sun dying .  Now I am making stencils to use on my Gelli Plate. I'm at the "copy every tutorial you can find" stage in my printing. If you do Gelli printing, you'll recognize these easy techniques. Here are some of the images I drew for my stencils. I'm enamored with folk art designs, at the moment. Folk Art Flowers and Birds by Florence Turnour Floral Wreath by Florence Turnour Here are some prints from my first effort with the Gelli Plate. I am looking for ways to embellish these prints, to add interest and help the designs pop o

Creative Chemistry 102 Day 2 Butterfly

Image
OK, so it is already Day 5, but I had so much work to do. I'm taking a break from it to try some more of the techniques in Tim Holtz's Creative Chemistry 102 class. Day 2 focussed on stencils, one of my favorite tools. I like cutting my own stencils from transparency paper, which is slick and easy to sponge through, and thin enough to stamp through. This time, however, I used a stencil from Crafter'sWorkshop. I made two samplers, and pasted them to the two sides of this middle sized butterfly. I was inspired by Tim's choice of blue and brown, but decided that I was in a green mood, and chose Distress Ink in Evergreen Bough and Vintage Photo instead. I like the speckled appearance made from little specks of clear embossing powder. Here's a close-up. Here's the start of my butterfly mobile project , including a butterfly made using Distress Paint as a resist, and here is a butterfly made using Distress Paint to create a faux patina look. Maybe there

Creative Chemistry 102 Day 1 Butterfly

Image
I am taking Tim Holtz's on-line " Creative Chemistry 102 " class this week. I didn't get to even start watching the videos until my kids went to bed, so I didn't have a lot of time to play with the ideas. It's the middle of the night now, so I'm going to show off my butterfly and not write a word about it.  (OK, a few words: Tim Holtz uses tags for his samplers. I use butterflies. Here is the start of my butterfly project .) I do enjoy these paints and inks! Great stuff! Thanks for looking.

The butterflies are coming!

Image
For some reason, the media (magazine articles, books and so on) about mixed media art seems to be half techniques, tools and materials, and half self help (egging the reader to have, for example, "the courage to create"). I am interested in the former, being already brave in the face of art supplies. I welcome recommendations for books, tutorials, blogs (yours?) or whatnot related to mixed media. My own next mixed media undertaking is underway. I began by drawing butterflies and cutting them out on my Silhouette cutter. I cut black butterflies a tiny bit larger, to matte these. I glued four black ones together to make a thicker more sturdy element. They are exactly the same shape, thanks to the cutter, and layered easily. My plan is to hang these from their holes. Next I decorated four white ones, and glued them to the front and back of two of my thick black butterflies. Here's one side: I stamped the flowers using Distress Paint, and then used Distress Stain

Flower Collage

Image
I made this Justrite Flower Collage for the JustRite Friday Challenge #102 . Justrite Flower Collage - by Florence Turnour It is a color challenge, with the colors shown here.  Miss Sheri (challenge hostess), I really was trying to hit the colors, honest, but my yellow turned gold.  I think I was afraid the Easter Bunny might come hopping and eat up my flowers if I stuck too close to his pallet. For the leaves, I used Justrite's Elegant Frond background stamp with black embossing powder, cut out with a retired Spellbinders set called Flower Creations, and painted with Twinkling H2Os.  The flowers are doilies from a retired Justrite Original set, similarly embossed and painted. The barely visible background behind the liquid pearl dots is Beka Feeken's vintage alphabet . I framed the background using a Spellbinders Majestic Squares die cut frame painted with a metallic Distress Paint.  Thanks for looking!

Mixed Media Workshop

Image
I went to a 2 hour Mixed Media Workshop with Kari Foteff from Strathmore today. Dancing Lady - by Florence Turnour Steve said, "Are you sure she's dancing? She looks like she's waving off a bee." She gave us a multimedia journal and guided us to use wet and dry media with the thick paper. She had us use gel medium as a glue, which was enlightening to me. Gooey stuff. I applied a wet wash on the paper, which didn't wrinkle, as advertised. Then I cut out and glued this gal on top. I used a stencil and dry brushed the background with paint Inktense block. When I got home, I outlined her with the Glaze gel pen that I discovered when I made Frog III . Letter Man - by Florence Turnour This is a Letter Man that I also made at the workshop. The point of this activity was to attach heavier elements to the paper, which, as advertised, didn't bend. I also used gel medium through an alphabet stencil, which worked nicely. The Inktense pencils and blocks mi

Sidewalk chalk

Image
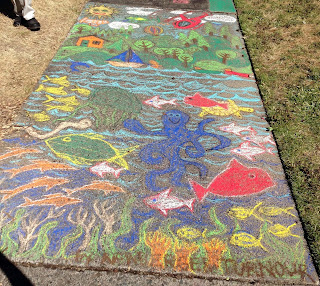
We recently went to Oregon to visit my parents, and attended the DaVinci Days festival. For $5 you could get a square of sidewalk leading up to the show and a box of chalk pastels to do with what you liked. We got two. Stuart (age 5) wanted to do a landscape and Benjamin (age 7) wanted an underwater scene. So be it. My mother and I joined right in. It was a little hard to photograph, especially since I was sort of trying not to touch my phone while taking the picture, since I was so covered with chalk. Here are some close-ups.  I love Stuart's trees and dolphin, above, and Benjamin's eel, jellyfish and octopus below. The four of us must have colored for a couple of hours straight and used nearly all the chalk in both boxes. It was a great time. Maybe we'll host such a thing around here some day. There were about two blocks of sidewalk artwork in this project. 

Frog III

Image
Frog III by Florence Turnour This frog is the same size as the first  Twinkling H2O frog . The paper is 6x8 inches. I reduced the  second frog  by 50%.  I am thinking I want to work small so I can trade ATCs with someone someday. What I learned from the last two frogs is that I have to be more careful with my backgrounds. In this painting I used my brayer to add a layer of ink and a layer of distress paint, which show through the subsequent layer of gesso only slightly. I wrapped the brayer with a layer of gauze when I rolled on the gesso adding texture to my paper. Finally, I painted the leaves with Twinkling H2Os. I had hoped for more contrast between the larger leaves and the background leaves but I don't have enough colors of paint. Yet. I cut the pieces of the frog from paper inked with Distress, and glued them to my background as a collage. Every leg and arm segment is a eparate piece of paper! To finish, I traced the leaves in black and the background in olive g

Another Frog

Image
This frog is smaller than the first one  because I reduced the sketch on the photocopier before tracing it onto the watercolor paper. I watched this video  by Dion Dior  showing a demo of painting with Twinkling H2Os , and noticed that she used watercolor pencils along with her paints, so I thought I'd give that a try. It's getting me closer to going multimedia (my goal). I'll let you know when I get there. Maybe when I do, I'll switch to a new frog sketch. Painted Frog - Twinkling H2Os and Watercolor Pencils Dion Dior did her background after she painted the focal image, but that's messing me up a little. I'm ending up smudging my image while messing with the background. More finesse is needed. I'm thinking about inking in my background first, next time, possibly avoiding the fuss.\ Thanks for looking.

Frogs

Image
Stuart and I had a frog drawing session. The next day we transferred the images to watercolor paper and painted then in with Twinkling H2Os, a watercolor paint laced with mica. Here they are: Frog with Painted Patterns by Stuart Turnour Red-Eyed Tree Frog by Florence Turnour I love the effect of stamping with clear embossing powder and then painting or inking among the white outlines of the image. But I wanted to participate in a project requiring original artwork, without stamps, and I had trouble getting that embossed resist effect without embossing powders, and I haven't enjoyed using the powders without the stamps. Then, I found these gel pens called Glaze that leave a three dimensional trail that resists watercolors and inks. Media In this project, I drew my frog from a photograph, and then traced the image with a clear Glaze pen on watercolor paper. Then I painted the image with Twinkling H2O paints. Did you ever notice that frogs have an extra set of knees

Early Spring

Image
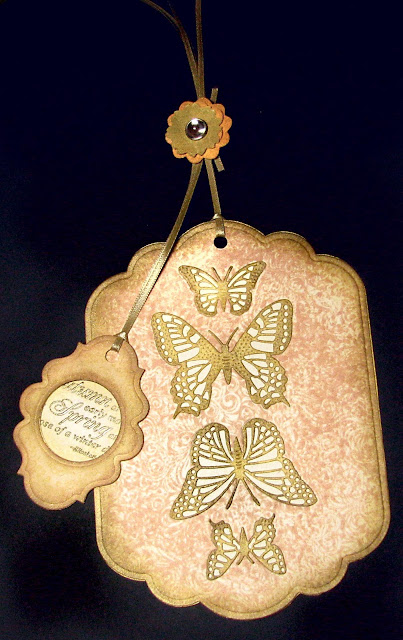
Everyone around me seems to think it is Spring all of a sudden. Three of the challenges that I follow, if not actually enter, are asking for Spring themed cards. The farmer's market was packed, and even the grocery store seemed busier than usual. I made this card for the   Justrite Stampers  Friday Challenge, "Suddenly Spring." (Nice name.) Early Spring I used the retired Justrite Original Nature's Nested set for my sentiment, cropping to feature the words "early Spring." The frame is stamped with a stamp from the Kindness set . Early Spring sentiment I cut out the butterflies with Cheery Lynn's Exotic Butterflies medium and small from the middle of a sheet of paper. Then I inked gold onto the butterflies and stamped the background with Justrite's Elegant Fronds background stamp (my favorite background) several times to cover the full area of the card. I cut out the card using a Spellbinder's Grand Calibur die, and sponged the edges

Peace Cat

Image
I made this card for the Justrite Stampers Friday Challenge 091 , which is a color challenge. Here is the challenge inspiration photo. The zig-zag on the cat, the doily on the background and the peace sentiment were all made with Justrite stamps. I cut out the cat by hand (and without drawing it first; lucky it came out at all!) from white cardstock, stamped and otherwise inked it, stamped stitched the background and put it all together. It was fun to get back to my more usual non-frilly self. Thanks for looking!

Celebrate!

Image
Celebrate! Why not? I had a great time going to the Anaheim Scrapbook Expo with my friends last weekend. I decided to use Justrite Friday Challenge to try out some of the products I purchased. Here's my card, "Celebrate!" Celebrate! Justrite Friday Sketch Challenge #090 This is my second sketch challenge. I'm still getting the hang of it, which in my case means I pretty much copied the sketch. My favorite new item so far is the glittered embossing powder I bought from  Sparkle N Sprinkle . I have long wanted to glitter my stamped images, and I've done it with the glue stamp pad, but what a pain to clean the stamps and myself and my work area.  I shy away from that glue every time I think of using it. The Sparkle N Sprinkle product is embossing powder infused with glitter leaving the image both crisp and sparkly. Neither the pictures in the Sparkle N Sprinkle shop that I linked to above, nor these pictures of my card really do a great job showing the glit

Enjoy

Image
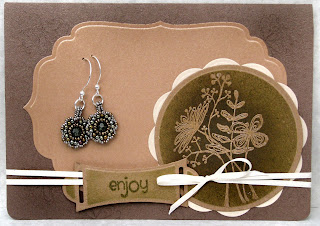
I made this card for a Unity Kit Club Sketch Challenge. After writing this post, I figured out that I missed the deadline for the challenge. Sad sad. So I'm entering it into the Fashionable Stamping Challenge ( Surprise Us ) and Simon Says Stamp Challenge ( Anything Goes , along with 500 other people), and Loves Rubber Stamp Challenge Blog ( Anything Goes ). December 2012 Unity Sketch Challenge I've not managed to use a card sketch before, though I like the idea of having a plan before I start pasting. I actually bought a book of sketches that I like to look at, but still I have yet to actually put shapes in the places they suggest on a card.  In any case, this time I wanted to play along on the Unity Stamp Blog, since I bought some Unity Kit stamps.  So I gave it a go. I made this card to hold these earrings I made for a fellow beader, as part of a new year's earring exchange. (I hope she doesn't look at my blog before I get them mailed off!) The earrings make n