Posts

Showing posts with the label Sihlouette cutter

Making papers

Image
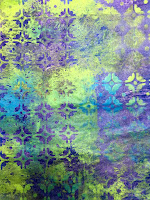
Today I donned the face mask and took to the garage to spray paint some papers for collage. I used the same stencils I've been using on the Gelli Plate, which I cut on my electronic Silhouette cutter. I still need to learn how to strategize to get patterns where I want them with the spray paint, but I managed to get some prints that I like. I also did some experiments with one of my face stencils. I didn't have a goal when I designed the face stencils. I'm hoping to come up with a collage idea in which it makes sense to use them. Thanks for looking!

Koi Part 2

Image
In the workshop  Creative Jumpstart  that I am doing, yesterday's lesson involved acrylic spray paint.    Michelle Ward  demonstrated spray painting through stencils using layers and masks.  I tried it with spray ink, which was fun, too, but it was much more interesting to work with the opaque spray paints.  I wanted to do it outside, so I had to wait for a break in the rain. It came this afternoon, and I took over the garage floor. I spent some of the rainy days cutting new pattern stencils on my Sihlouette Cutter. I draw them in Adobe Illustrator and then use a plugin to cut them. The pattern in the images above is my favorite.  I also painted my hands, just a bit.   About the colors, Michaels had an odd selection of their paints on sale. I bought 7 colors, but they were not the ones I'd have chosen if I had not been trying to be frugal. For example, here's a series in lemon and tomato. Here's a close-up of th...

Koi Part 1

Image
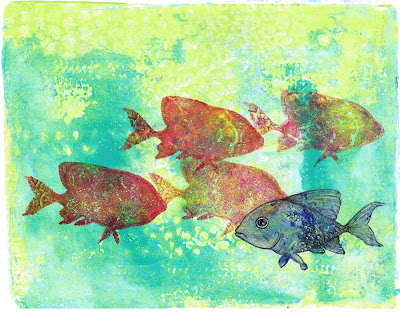
In the workshop Creative Jumpstart that I am doing, yesterday's lesson involved acrylic spray paint, which is (no I'm not kidding) an art supply that I didn't own (yes, I got some). The video by Michelle Ward made it look like so much fun, I thought a little spray paint could be fun to own.  It was actually on sale at Michaels; I think they are downsizing since only the weird colors were on sale. I got a few but I haven't used them yet, since, in an odd turn of events, it is raining making my well ventilated (back yard) work area soggy. In the meantime, I decided to try the activity with Dylusions sprays.  I cut fish stencils out of printer paper and then sprayed them with a waterproof sealant (since I was pretty sure I'd be drowning them in ink).  Some of my prints worked well, without much leakage under the stencil, but I like the bright colors you get by soaking the paper so I chose this one, which was not an excellent print. After writing on it with Permap...

Gelli Prints

Image
I made some new stencils to Gelli Print though. On this one, I drew on the print with black and white pen. I like the tree stencil, but I'm enjoying using the cut-out portion of it as a mask more. And last, here are some birds. I know many people use their Gelli Plate prints for collage, so this isn't revolutionary, but after printing with my stencils for a while, I notice that the masks look like they'd make great collage elements. Does anyone cut and then print on the little bits? Or does everyone print and then cut? I make my stencils from overhead projector slides. These are the masks Thanks for looking!

Monoprinting without a press

Image
I am now the proud owner of another craft tool, the Gelli Plate .  They have a very active facebook page, and after watching interesting image after image go by, I finally gave in and ordered it. I love stencils and am excited to have another incentive to make them. I have made stencils before, using old overhead transparencies in my Silhouette electronic cutter, for use on paper, with stamps and for use on fabric, sun dying .  Now I am making stencils to use on my Gelli Plate. I'm at the "copy every tutorial you can find" stage in my printing. If you do Gelli printing, you'll recognize these easy techniques. Here are some of the images I drew for my stencils. I'm enamored with folk art designs, at the moment. Folk Art Flowers and Birds by Florence Turnour Floral Wreath by Florence Turnour Here are some prints from my first effort with the Gelli Plate. I am looking for ways to embellish these prints, to add interest and help the designs pop o...

Creative Chemistry 102 Day 2 Butterfly

Image
OK, so it is already Day 5, but I had so much work to do. I'm taking a break from it to try some more of the techniques in Tim Holtz's Creative Chemistry 102 class. Day 2 focussed on stencils, one of my favorite tools. I like cutting my own stencils from transparency paper, which is slick and easy to sponge through, and thin enough to stamp through. This time, however, I used a stencil from Crafter'sWorkshop. I made two samplers, and pasted them to the two sides of this middle sized butterfly. I was inspired by Tim's choice of blue and brown, but decided that I was in a green mood, and chose Distress Ink in Evergreen Bough and Vintage Photo instead. I like the speckled appearance made from little specks of clear embossing powder. Here's a close-up. Here's the start of my butterfly mobile project , including a butterfly made using Distress Paint as a resist, and here is a butterfly made using Distress Paint to create a faux patina look. Maybe there...

Magnet Dress Tags

Image
My dress stencil just turned die cut. I'm using the cut-out this time, to make these magnetic dress tags for the JustRite Challenge #77 "Tag you're it!" Magnetic Dress Tags I drew the dresses in Adobe Illustrator and cut them out on my Silhouette cutter (to make stencils, originally, here are some stenciled dresses ). I cut out some dresses from white card stock, and another set from magnet paper. I stamped and sponged them, and then colored them with my Prismacolor Pencils, blending with so called Odorless Mineral Spirits. On the purple dress, I used a stamp from the JustRite Original set called My Garden Set . I love the flowery dress; I was going to do them all in flowers, but I decided to shoot for variety.  The To and From stamps on all three dresses are part of a stamp in the   From Our House Set , and cut out with a die from JustRite's  Vintage Label and Banner Dies . Magnetic Dress Flower Tag On the Christmas dress, I used a snowflake posta...

Star Lady dresses for the 4th of July

Image
Star Lady decided to forgo tradition for this year's 4th of July party. She reached into the back of her closet and pulled out her most festive pair of lederhosen. I have so many more JustRite stamps than I did last time I entered a Friday Challenge that I had a hard time choosing which ones to use for the Stars and Stripes Friday Challenge project. Star Lady's lederhosen were made from the Stitched Ribbon Background Stamp with suspenders and rhinestone studded belt from the matching border in the Classic Scallop Borders One set. Her party hat is another of the border stamps in that same set. Star Lady accessorizes with a handbag stamped "Live your dreams," from the Going Places Vintage Labels set, a sentiment that she felt somehow justifies her outlandish choice in wardrobe. Her purse dangle is a Tibetan Silver cat charm. ( Tibetan silver is a zinc alloy that is made into charms and findings in China and sold on ebay for very good prices (though it comes...

Come into My Garden

Image
I made this project using the shirt stencil I talked about here . This time, I cut the stencil out of acetate (an overhead transparency) so that I can wash it off.  The stamps are from Blockheads Stamps , which inspired me to use the embossed resist technique with their technique challenge (see below). I like the results so much, I also entered them into the Stamp Man's Favorite Technique Challenge . My favorite technique definitely has to do with sponging with stencils. Come into My Garden I used two Calendula stamps for this card, the full plant on the frame, and a single flower for the shirt. I used Justrite Stampers (retired) font system to write "come into my," and added the word Garden from this Blockheads set (I should have gotten the bigger bunch of tulips! Next time...) I stamped the single flower through the stencil and embossed the image with clear embossing powder. I replaced the stencil and sponged (and brushed) ink to reveal the flowers. I did th...

Shirt Tag

Image
I drew a Hawaiian Shirt (two days after the challenge that inspired me was over) and made a stencil. Then I used the embossed resist technique to decorate it with white flowers. The stamp is from Inkadinkado. Hawaiian Shirt Tag I'm going to make a few more shirts, but I was happy enough with this first go to show it off. I love to sponge through stencils. Fabric seems to come out extremely well with this technique. In addition to this shirt, I've also made an apron and a dress . This shirt is actually three stencils. Here are the outlines: Shirt stencils If you want to use my stencils to make your own wardrobe, and have a cutter that can cut from an Adobe Illustrator file, I'd be happy to share. Shoot me a message. Thanks for looking!

Here comes the sun!

Image
This frustrating pop out card took me three tries to excecute, and I'm still not entirely happy with it. I am moving on, though. I learned many things about designing these flip cards, and I'm going to try again now with a simple circle and my new Flourishes stamps. For today, here comes the sun! Here Comes the Sun I used a Spellbinder die for the sun, and some unlabeled tiny letter stamps, but I drew the clouds myself and cut them out on my Silhouette cutter. I'm submitting this one to the Simon Says Stamp! Anything Goes challenge . Have a sunny day! 

You Look Smashing

Image
This one is inspired by the Just Us Girls Challenge blog. Here's the how-to sponge video from Gina K. I watched her stitching on cardstock video as well, before having a go. I love to sponge, so when I saw the Just Us Girls sponging challenge, I hauled out the stencils that I made a few years ago (here is my post " Butterfly Dresses " from 2010). I drew the dress image in Adobe Illustrator, and then cut it out of an overhead transparency (acetate) on my Sihlouette cutter . Then I sponged through the stencil, and stamped over it with a butterfly background stamp (it's unlabeled, so I don't know where it came from). I like the idea of stitching on card stock, so I gave that a try here. I now am certain that I need more colors of thread.  Every time I try a new technique, I end up needing more equipment! I have a confession to make: when I uploaded this card to the challenge, it had fewer elements. I had thought I was done, but changed my mind, and add...